
Here's a first world problem: I have no idea what to do with all of my holiday boxes.
My ninja-mom went to Sephora and bought me a (really awesome) gift set. And it came in a really nice, sturdy box that I couldn't seem to throw away. I can really use a box right now. I just moved and I have all of these misplaced nick-knacks and what-nots. BUT, having a box with a Sephora product advertised on it, well, that't not gonna fly in my new apartment.
(Remember? I told you. I said, "I decided that I want my new apartment to be AWESOME. And an awesome apartment is an apartment with awesome stuff inside." That's a direct quote from the TV stand post. Pay attention.)
Another quote from the TV Stand post: "When life gives you lemons, cover them in glitter and glue."
And that is pretty precisely what I did with the gift box.
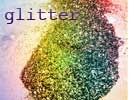
KAPOW!
Glitter Box.

I'm pleased to introduce the latest item to my collection of desk things. Everything in my apartment is slowly turning neon.
Supplies:

1. A box from a Holiday gift set.
2. Scissors.
3. Glitter adhesive from Canal Plastics.
Step 1:

Place the glitter adhesive face down and cut a piece that is 1.5-ish inches larger all around than the box top.
Step 2:

Peel off the protective backing so that the adhesive is facing up.
Step 3:

Place the top of the box in the center of the adhesive cut out. Carefully fold over to also cover the sides.
Repeat this same process for the bottom, but cut the adhesive to be even larger because the sides on the bottom half of the box are larger.
ALSO, has anyone else noticed how offensively pale I am? I mean - I'm basically the same color as the inside of the box. I need to get to mexico stat. (Even then, I would slather on the SPF 8,000 and sit in the shade with a beach hat. There's no hope for my skin ever being tan. This makes me a sad chicken.)
ALSO part 2:
Learn from my mistakes. The adhesive is not opaque. If there are darker markings on your box, spray paint it with white first. I ended up adding TWO layers of adhesive to the top part of the box because of the black lettering. And that led to annoying air bubbles.
But I still succeeded!
Glitter Box!


E-me your projects from recycled Holiday things! E-me what you covered with glitter adhesive. I really like getting emails. Just do it. For me.
3 comments:
This looks incredible! I love it!
Note to self: photograph everything I've ever crafted and send to Melissa so she'll think I'm cool. I want to be cool. Like Melissa. I love you :)
Awesome idea. Fun and decorative boxes are always a great storage idea. And can be so cheap! I have all kinds of boxes I can dazzle up. (Dazzle = make fancy) =)
Post a Comment