November 10, 2011

My Phone is a Stud

Remembered when I made glittery sunglasses and you were all like "why so much glitter?" and I promised you that I would do my best to show alternative materials to glitter sometimes? THIS IS ONE OF THOSE TIMES! This is great news for all of you glitter haters out there. (I don't get you.)

For my first post I made my cell phone case sparkle with glitter. It was glorious. Today, we are going to turn your cell phone into a studded dream. Goodbye glitter, hello hardware. (It hurt my heart to type that.) No, but for real, I do love me some studs and I have been looking forward to making this for a while. Are you ready? Get set. GO!

Supplies: 
1. Iron-on studs from M&J (for an iPhone, I needed two packs plus 2 studs from the third)
2. A small paint brush from Michaels
3. Strong glue from M&J
4. An old cell phone case (I suggest a slim and stiff case with a very flat back. I used an Incase brand case. Highly recommended)
5. Some sand paper from my local hardware store
6. A working surface (I used some old foam core than I found lying around under my bed)

Step 1: 
Lightly sand the surface of the cell phone case to give a rough texture. This helps the glue bond the two surfaces together. Don't get crazy! When you are done your case should look something like this: 

Step 2: 
Plot out your studs in a horizontal and vertical line. PLANNING IS IMPORTANT. This will help you get an idea of how tightly you should pack your studs. AND you won't end up with half a stud hanging off the edge. Planning rules.

Step 3: 
Put some glue on your working surface and dip your paintbrush into the goop.

Step 4: 
Cover the back side of a stud with glue using the paint brush.

 Step 5: 
Place stud in its position. Repeat with studs until entire surface is covered.

Step 6: 
Let that baby sit and dry for a while. Then clean up any access glue.

And here you have it:
A bling-bling pimped out cell phone that DOES NOT have any glitter on it. Who knew I could swing it? This shit is pretty classy. YOU'RE WELCOME. 


November 9, 2011

Hardware Friendship Bracelets

Hey, guys! I'm about to show you how to make bracelets entirely out of materials from The Home Depot. That's right. This chick knows her way around The Home Depot

No, that's not true. I can't lie to you! I literally had to ask 9 different employees for help to find 4 items. There were 10 items on my shopping list. I gave up on the rest. So sad. So, SO sad.

What is exciting, at least in my opinion, is how you can make awesome girly stuff from the manliest store I know. So next time your boyfriend, manfriend, lover, husband, brother, dad, uncle, or any other sort of male companion drags you to The Home Depot, you will have an agenda all your own. And it will BLOW THEIR MIND. 

What you need:
1. Scissors
2. Neon rope from The Home Depot
3. Hex nuts 1/4" from The Home Depot

Step 1:
Cut two long stands of your neon rope. I cut an arm span length, which was too generous but also safe because I knew I wouldn't run out of rope. 

Step 2:
Fold each string NOT IN HALF but so that one side is a few inches longer than your desired bracelet length and the other side is very very long. Then tie the two stands together in a loop as shown above. 

Step 3:
Arrange your stands to have the two short ones in the middle and the long ones on the sides.

Step 4: 
Thread a hex nut on the inner two strands.

Step 5:
Take the left strand and place over the shorter two strands so that it looks like a "4."

Step 6:
Thread the long stand under the shorter two and then over itself.

Step 7:
Pull tight! Now repeat on the right side. The repeat steps 4-7 until the bracelet is at your desired length.

Step 8:
After the last hex nut, tie a knot with the strands to secure the bracelet. 

Step 9:
Slide a hex nut onto the shorter two stands.

Step 10: 
Tie a knot around the last hex nut with both longer strings together. (This will serve as your clasp. When you're ready to wear your bad-ass bracelet - just loop the last hex nut through the loop made at the top of the bracelet. Genius!!) 

TA DA: 
Go crazy, try some experimenting with different patterns and colors. I made all four of these in about an hour's time! And I'm gonna wear them to work tomorrow!

Did someone say arm party??
I'm so fly. 

E-me pictures of YOUR amazing hardware creations! Too scared of The Home Depot to make your own? I'll be happy to help you out... for a price! E-me your request! 


November 4, 2011

That's Right. I made Glitter Sunglasses.

Last night I made me some glittery sunglasses. Yes, on a Thursday night, while you were out drinking with your friends, I was at home crafting. It was EPIC. (But for real, I swear I have friends. Lots of 'em! It's just - I'm running this marathon on Sunday so I'm trying to limit my partying until after I do that.) 

Now, I know what you are thinking. This is only my third post and I have used glitter two times already. That's a lot of glitter. 
LISTEN UP, PEOPLE: there is going to be tons of glitter on this blog. Why? BECAUSE I FREAKING LOVE IT. That's why. I will, however, offer alternative materials some times when appropriate for all those glitter haters out there. This does not happen to be one of those times. SO DEAL. 

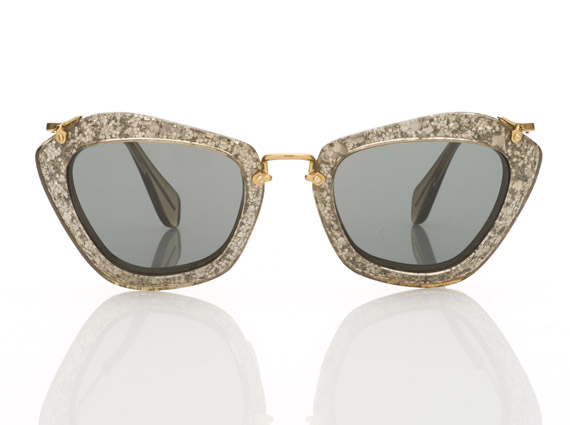
Anyways, I have fallen head over heels in love with Miu Miu's Fall 2011 Noir sunglasses: 
I want them. I need them. I decided that they would be mine, whatever it took. I called my mom in September letting her know that I found my Hannukah gift and that she could pay me back for them at her earliest convenience. I marched myself to the Miu Miu store in Soho to secure my pair. Lo and behold, they are VERY MUCH sold out, and the lovely sales ladies didn't know when they would be back in. They did not offer to put me on a waiting list. RUDE. I offered my phone number so that they can call me when they expect a new shipment. They took it down on a post-it. A POST-IT. There is no way they are going to call me. Ever. About anything. 

So the only option at this point was to make my own pair. That being said, should these babies become available for purchase again, I WILL be buying them. The ones I made are great, but Miu Miu's are better. No, not better - they are perfect. I don't care that they cost almost 400 dollars! I'll starve for a few weeks. That's no big deal, I could stand to lose a few pounds anyways. I'M WATCHING YOU MIU MIU. I'M READY TO POUNCE. 

What you need to make your own Miu Miu Noir sunglasses:
1. White spray paint from Michael's
2. ModPodge from Michael's
3. Paint brush from Michael's 
4. Masking tape from my local hardware store
5. Glitter from Michael's (I chose Martha Stewart's Rose Quartz)
6. A pair of old sunglasses (or buy new cheepies, maybe from Urban Outfitters)

Step 1: 
Tape off the lenses 

Step 2: 
Spray paint glasses with the white spray paint (Glitter shows up better on a light surface. Only take this step if your glasses are dark like mine.)

Step 3: 
Mix equal parts ModPodge and Glitter with your paint brush

Step 4:
Paint your sunglasses with the Glitter/ModPodge paste

Step 5: 
Let dry

Step 6: 
Peel off masking tape

Step 7: 
If it's looking a little thin in certain areas (like mine), touch up with your Glitter/ModPodge mix.

And here is a low-quality picture of me wearing my new faux-designer sunglasses. At night. In my bed.
 SUPERCUTE! Now you make some! Or e-me and I will be happy to take your custom order! Ciao! 


November 3, 2011

Let's Make a Chalkboard!

Hi again! You are about to learn how to make a chalkboard. "Make a chalkboard?" you ask. YES! It's just like magic. So exciting. 

Supplies: 
1. Chalkboard paint from Benjamin Moore Store
2. Paint brush from Benjamin Moore Store
3. News print or other cheap paper 
4. Frame and board (or in this case - old canvas) I bought this at a store called "Junk

And let me tell you a thing or two about Junk:
For all of you New York City-based crafters, upcyclers, DIYers, hoarders, and people who like to collect useless crap, I am about to BLOW YOUR MIND. Junk is an awesome store in Williamsburg, right off of the Bedford L stop. Too easy! 

The store is named pretty accurately, it is a store full of junk:

I have found some serious treasures in this dusty goldmine. Shopping here can be a bit overwhelming without an agenda. Believe you me, I ALWAYS have an agenda at Junk. This trip was to purchase frames. And look at all of my options! (Sorry for the blurry pic! I was using my phone.):

I also picked up some silverware for a later project. So, get excited for this: 

And maybe, just maybe, you fancy a fake fireplace with a ship on top:

These are just some of the great things you can find at Junk. The frame and canvas that I bought for this chalkboard cost only 10 dollars! 10 dollars I tell ya! So, go there to buy supplies! You can thank me later. 

And now, back to our scheduled programming.

Step 1:
Cover your working space with paper and place your frame and board in the center. (I should also note - whoever painted this ugly thing laid the paint on THICK. To avoid texture on my chalkboard, I sanded it down.)

Step 2: 
Open up the chalkboard paint and mix it up to make sure it has an even consistency. "Who is that furry face in the top right corner?" you ask...

That's my cat! I like to call her Bitch Face! Here she is making a bitch face:
DON'T WORRY, her name isn't really Bitch Face. That's just an endearing nickname. She is actually named Lola, and she likes to be involved in my projects. So you can get used to seeing her photobomb my pictures. 
YOU GUYS! Stop distracting me. Back to business.

Step 3: 
Paint on the Chalkboard paint

Step 4: 
Let dry for at least four hours.

Step 5: 
Paint on a second layer.

And, DuDuDuDahhhhhh: