November 30, 2011

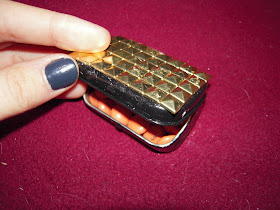
Studded Pill Box - For the Bad-Ass Granny that You Are

I don't know about you, but I pop Advil like candy. If ANYTHING is hurting me, I make sure that shit is eradicated with my best friend: Advil. So, I like to carry a supply around with me. I have yet to find a cute AND convenient pill box to keep in my purse. I want to feel fabulous while I act like a hypochondriac. Good stuff, right? Aren't you so glad you found me? 

Since I couln't find what I wanted, I made it my job to make it. Ladies and Gentlemen, (do any gentlemen look at this blog?) I give you:
The Studded Pill Box

November 29, 2011

Rhinestone Sunglasses!

More sunglasses? YES. More sunglasses. Never enough sunglasses. And these are FANTASTIC. 

A few weeks back I found this image somewhere:
Boy, oh boy, oh boy! Was I excited. I have been looking forward to making my own ever since. (And, AGAIN, I lost the source. It was not a DIY item, but rather sunglasses for sale. And they were mucho dinero. Not an option for me to purchase.)

Mine are not half bad! Check it out!

November 28, 2011

Stud yo' wrist!

Happy Monday, Amigos! I hope everyone had a supremely excellent holiday weekend and that you ate yourselves into a week-long coma. Now that turkey day is over, it is high time to start crafting for HOLIDAY GIFTS!!! EEEEEEEEEEEEEEEEEEEEEEEEEEEEEEEEEEEEEEE!!!!!
(Did you guys not get the memo? It's time to start holiday shopping. The media sometimes fails to let us know about it. But its time... Black Friday was this weekend, today is Cyber Monday. There are deals. No? Nothing?) 

...Anyways, I will be doing my best to give you awesome gift ideas. Today I give you: 
The Studded Bracelet! SHIT, SON!
Two things:
a) This is a perfect accessory for your studded phone case. Just sayin'.
b) This is another one of those projects that was 100% inspired by another DIY blog. And, again, I totally forgot where I saw it. (This is going to stop happening soon! I got pinterest! FOLLOW ME! So I will be able to start giving credit where credit is due, like a good blogger.) But I can assure you, this came from one of the blogs on my inspiration list to the right. So click away!

That's all for now. LET'S DO THIS!

November 25, 2011

Fimo Coasters: My Greatest Crafting Secret Revealed!

OMG, WHAAA?! That's right, I am about to share one of my most sacred crafting secrets. My fimo flowers! (You can for sure find a step-by-step on youtube. I like to flatter myself.) 

SO, for my entire junior year in college, I lived abroad. During my second semester, I wasn't so much a "student" in the traditional sense. I was doing an "independent study" in photography, an "internship" at an itty bitty private museum, and I "volunteered." These quotations are probably misleading. I really did all of those things (for credit), just the bare minimum. Needless to say, I had a shit-ton of of free time on my hands to do whatever the hell I felt like. 

I volunteered as an assistant to an arts and crafts teacher who taught me the magical ways of FIMO! I was SO excited about this new material, that I marched myself to the only art store I could find to buy my own supplies and started experimenting. One of my favorite discoveries was how to make coasters. I only made one or two at the time, but have been looking forward to making more. I think it's time. 

November 23, 2011

BABY LAMP! BABY LAMP!


My deepest apologies in advance. This is a project I started almost 2 years ago. WAY before this little blog was even a thought in my glittery brain. So there is some background information that I need to tell you:
I made this ceramic baby in school, in my ceramics class, using a 6-piece-mold. I can't exactly tell you where to buy it, cause, you know, I made it. So unless you have the keys to NYU's ceramic studio, we are kind of screwed in the potential acquisition of another ceramic baby. I'M SORRY. 
Now, ceramic babies aren't easy to come by, but the great news is: you can make a lamp out of ANY hollow vessel!! AMAZING, I know. Here are some great substitutes for the ceramic baby: wine bottle, mason jar, ceramic baby. You get the idea. 

We need to get something clear: 
I know this is a weird item. It's a lamp with a glittery baby as a base. I started making this while I was in art school. As a piece of art. Not as a household item. I think I was trying to make things that are inviting but simultaneously off-putting. THIS IS INTENTIONAL. I am not a crazy person. I promise. (Please keep reading, I love you.)

ALSO, this is why some of the work is already completed in the supplies photo, but none of the heavy lifting. So fear not, dear crafter, I will not leave you behind!

November 22, 2011

Drunk Crafting: Wrapped Sunglasses

I made these on Saturday night, between 1am and 3am, after coming home from a party:

Most people eat pizza and/or make out with strangers at 1am on a Saturday. I go to town with my crafting supplies. WHO AM I?! 
This is why I'm single. 

But I am particularly pumped about these sunglasses cause they are really really rad. I wore them the next day around the city and TWO people asked me where I got them. (This was all fuel to my Etsy shop fire. Coming soon.) The best part: these are stupid easy to make. I mean, think about the state I was in when I made these. Now imagine how much more potential they would have had if I made them twelve hours earlier. Eh? EH?!

Now that's food for thought.

November 21, 2011

No Mess Glitter Coasters!

Happy Monday, friends! I am particularly jolly on this Monday, because it is a short work week! WOOOO! YAY turkey day! 
I'm very excited about the whole thing because not only will I not be working, but I will simultaneously be eating ridiculous amounts of delicious food. It really doesn't get any better than that.
 I also plan to go crazy at the suburban Michael's and Home Depot. Crafting in this city is NOT EASY. There is barely any space to work in my tiny apartment and it's impossible to get supplies! Michael's on 96th street?! Are they kidding? It takes the hand of God to get me above 14th street for anything else. 
Cars: One of the may reasons why I love going home. 

Back to business crafting. How crazy is this post's title?! "No Mess" and "Glitter" are mutually exclusive in general. But not today, dear readers, not today. I found the most amazing product at a plastics store on Canal Street, called Canal Plastics (get it?) They sell, what for it... GLITTER ADHESIVE. What is that? Oh its just a GIANT GLITTER STICKER that is sold by the yard. THE YARD. It's absurd. 

I used my new glitter adhesive to make:
GLITTERY COASTERS!!!
ooOOooOooOoOooOOOoooOOooOOOooo! So shiny!

November 18, 2011

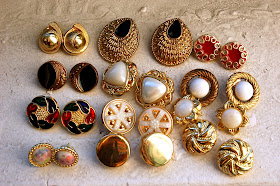
DIY Vintage Earrings. WHAT?!


You heard me right. DIY vintage earrings! Well, not for real vintage earrings, but vintage style earrings.
SEE: 
Lookin' granny chic! Right? RIGHT?!

I love vintage fashion, but I rarely wear it. Why? you ask. Because I hate vintage stores. First of all, they smell really bad. Like moth balls, dust, and sadness. Also, ever since the bed bug infestation in NYC, I have developed a phobia of secondhand stores. I don't know, I just think secondhand stores are like a breeding ground for bed bugs. It's not totally logical, but we all got a little bit of crazy in us. 

So back when I was still a fetus in high school, I bought this crazy bag of Fancy Buttons from Michael's:

No really, they are called "Fancy Buttons." And I have the Value Pack. Bad-ass. 
I thought that I could use them to jazz up a boring shirt. I never did that. And good thing I didn't, because these earrings are gold. (Well, actually plastic, but you know what I mean.) So with out further ado...

November 17, 2011

Chalkboard Planter

I don't keep plants in my apartment. There isn't enough natural light and I'm pretty sure they would die. (I'm not the best caretaker.) But before I even would have a chance to kill the plants, I'm sure my asshole of a cat would attack them, knock them over, piss in them, really do anything to terrorize the innocent plants. SO, moral of the story: no plants in my apartment. 

IF I had plants I would want them to be in awesome planters. And that's why I made these (for the future me - a me who has the ware-with-all to take care of a plant):
Chalkboard planters are a brilliant idea really (not to toot my own horn) for the unorganized and/or amateur botanist. You can LABEL your plants, write watering and sunlight instructions, and anything else that tickles your fancy RIGHT ON THE PLANTER ITSELF. 

Did I just blow your mind? I bet I did. I BET I DID.

November 16, 2011

One More Bracelet!

No, I'm just kidding. There will definitely be more than one more bracelet. As it turns out, I have a tendency towards making bracelets. This is news to me, but I am going with it. You know, sticking with what works.

FULL DISCLOSURE: I definitely got the idea for this bracelet from another blog. The bad news: I can't remember which!! The good news: I have listed all of my favorite crafting blogs to the right. It was definitely from one of those. I'm just trying to give credit where credit is due. And I'm failing. I'M SORRY.

But this bracelet is really pretty. People asked me WHERE I GOT IT. They thought it was purchased. From a store. WHOA. 

What you need: 
1. Pliers from a local hardware store
2. Rhinestone chain from Toho
2. Two chains of equal size and length from Toho
2. Suede strand from Toho
3. Clasps from Michael's
4. Hooks from Michael's

Step 1: 
Tie the two chains together using the suede strand. You can't tell, but the right strand is WAY longer than the left strand. Yours should be the same.

Lola and I got into a fight over the suede strand:
Bitch. 

Step 2: 
I'm not good with words so this is going to be hard to describe, but the picture is a good visual reference. Take the longer side of suede and thread it through one chain from underneath and then the other from above. 

Make sense? I hope so, cause that's the best I got.

Step 3: 
Hold the rhinestone chain at the center of the two chains.

Step 4: 
Thread the suede just like in step 2, except this time over the nook in the rhinestone chain. Continue this pattern until you reach your desired length. 

Step 5: 
Cut excess chain and rhinestone chain with pliers. 

Step 6: 
Attach clasps to one side of the bracelet and hook to the other. Trim excess suede. 

AND THAT'S IT! 
DAYUMMMMM. That was fast. I also made one using only one chain. Experimenting is COOL. 

Here I am about to head out for a night on the town wearing my cool new arm candy. YEAH YUH! 


e-me your gorgeous creations! Or not. I can always make it for you. e-me anyways! 


Not Your Grandmother's Silverware

Last week I told you about a real gem of a store: JUNK in Williamsburg that sells tons of great up-cycle items. On my last visit, I bought a boat load of old silverware:

Those are Junk's silverware bins. And let me tell you those were some DEEP bins. I decided it was my purpose in life to make these old, neglected utensils super cool and loved. It was... AWESOME

Are you all ready, are you ready get set, are you ready, get set, LET'S GO!

What you need:

1. Old silverware from JUNK
2. Paper to protect your floor (newspaper is a great option)
3. Silver polish from a local hardware store
4. Silver polish rag from a local hardware store
5. Enamel from Home Depot in the colors of your choosing (I got blue and yellow mostly because they were the only premixed colors and I was there on a Saturday and the line was forever)
6. Dish soap from my kitchen
7. A sponge from my kitchen
8. Duct tape from a local hardware store

Step 1: 
WASH the silverware. Wash it like its your job. Wash it like your life depends on it. These have been sitting in a nasty bin at a store full of junk and dust. Who knows who has touched or eaten off of these babies. HYGIENE IS IMPORTANT. I'm glad we are all on the same page. 

Step 2: 
Use the silver polish rag and silver polish to polish your silverware. I used the word silver and polish three times each in that last sentence. 
Anyways, this is TEDIOUS. But do it, and do it good. You will be happy later when your utensils are all shiny and shit. 

See my fresh beautiful rag and clean hand in the pic above. Well, check out the After pic:
Nasty right? At least it's on the rag and not the silverware.

Step 3:
Wash everything again. I can't be sure but I don't think silver polish is meant to be ingested. 

Step 4: 
Set up a drip dry station as I did above. Place a strip of duct tape between the legs of a piece of furniture. Make sure your floor is covered well with paper. Enamel is permanent. You don't want that on your floor because there goes your security deposit.

Also, LEARN FROM MY MISTAKES: make sure you are in a well-ventilated room that is preferably NOT your bedroom. Enamel has some serious FUMES. I may or may not have coughed myself to sleep. I honestly can't be sure. The fumes really got to my head and I don't remember most of the night. (That's not true. I made a point of leaving because I was afraid that would happen. When I got home it was 2am and I was drunk - that's why I don't remember how the fumes affected my sleep. But it couldn't have been healthy.)

Step 5: 
Dip the handle of your silverware into the can of enamel.

Step 6: 
Hold the dipped silverware over the paint for a little while to save the majority of the excess enamel on the handle. 

Step 7:
Place the piece of silverware onto the duct tape to let the rest of the excess enamel drip off.

Step 8:
Let the silverware dry there for at least 24 hours. Once they are completely dry, take them off, and wash again. Don't use silverware that has been covered in duct tape for 24 hours without washing. That can't be good for anyone.

My silverware looks AWESOME!
I suppose this would be a particularly superb set for a Michigan fan. Blue and Gold. Anyone? ANYONE? 
YOU GUYS. I made a football reference. That's a BIG deal. 


And you know what, if yours didn't come out as gorgeous as mine, I'd be happy to make some for you. Not the worst thing, cause at least you made a Jackson-Pollack-like piece of art!


Lola loves Jackson Pollack.

"Can I put my new awesome silverware into the dishwasher? Cause I'm a fancy pants person and I have one of those," you say. Well, you know, that's a good question. I didn't know the answer. But then I googled it for you and it seems like it shouldn't be a problem. I don't have these issues cause my shit apartment doesn't come with a dishwasher. I would recommend trying one piece and seeing how it holds up. Then let me know so that I can be a better craft genius than I already am. COOL. 


November 14, 2011

More Bracelets!! WOOOO!

Hey, guys! Remember when I made bracelets entirely of materials from The Home Depot?!?! Well... we will not be doing that today. 
We will, however, be making super nifty bracelets out of materials normally used to make bracelets! YAY for being boring (and knowing my way around the supplies store)! No for real - the outcome is not boring. PLEASE KEEP READING! (I'm nothing without you.)

What you need:
1. Scissors
2. Leather strand from M&J (embroidery thread also works like a dream)
2. Leather braided cord from M&J
3. A rhinestone chain from Toho
4. Ball chain from M&J
5. 1/4" hex nuts from The Home Depot
6. Pliers from a local hardware store

Step 1: 
Cut a piece of the braided leather cord to your desired length. I decided that my bracelet would wrap around my wrist twice, so mine is pretty long. 

Step 2: 
Tie a loop with your leather strand (or embroidery thread) and then secure that to the braided leather cord with another knot. Your loop will act as part of your clasp for this bracelet. It should be large enough to fit a 1/4" hex nut through, but small enough so that it won't slip through on its own. 

Step 3:
Hold the ball chain in place against the leather braided cord and start wrapping the leather strand around the cord and the chain. Make sure the leather strand is in the nooks in between the balls of the chain. Do this all the way until you reach the bottom of your braided leather cord. 
(This picture explains this so much better than my words. I did not major in English. And there is a reason for that.) 

Step 4:
Tie a knot with the leather stand and cut the ball chain off where the bracelet ends.

Step 5:
Thread a hex nut onto the leather strand and secure it with a knot. Then cut away the extra strand with you scissors (not pictured).

Step 6: Go CRAZY!
Follow the same steps with a rhinestone chain, or a pearl chain. Experiment a little! HAVE FUN! GO NUTS!!!

Now take a look at my bad-ass arm party!
I could make these all day. 

And so can you! e-me your beautiful creations! OR I'll make them for you!


I Made an Earring Tree

Happy Monday, everyone! I hope this past weekend was awesome all around. While you were out gallivanting, I was in playing with glitter and glue. Are you SO excited to see what I made? I knew you were. 

Supplies: 
1. Wire mesh from a local hardware store
2. Scissors
3. A cheap frame from Michael's
4. Two paint brushes (one extra small, one small) from Michael's
5. A stapler from Staples (tee hee)
6. A board or working surface that you can throw away – I used some old foam core that I found under my bed

NOT SHOWN:
1. A ribbon – I got mine from my Grandmother's old sewing supplies bin – but they have lots of ribbons at Michael's or M&J

OPTIONAL:
1. ModPodge from Michael's
2. Jewel Star rhinestones from Michael's
3. Martha Stewart Glitter from Michael's
4. Strong glue from M&J

Step 1:
Remove everything from your frame except the frame itself. You will not need this stuff so you can feel free to throw it all out or hoard it for a future project. I chose the latter. I hoard. 

Step 2: (optional)
Mix equal parts glitter and ModPodge.

This is the first in a series of steps to decorate the frame. This is optional. I obviously decided to make my frame glittery (to match my glittery earrings and my glittery soul and my now glittery face - 'cause I got glitter all over myself during this project). 
Glitter ain't yo thang? Try spray-painting the frame a fun color! Maybe you fancy yourself a plain-jane or a minimalist – don't decorate the frame at all! Or MAYBE you found a nice frame to begin with and you don't have to hide it's shittyness with copious amounts of glitter and glue. 
I don't know what your situation is – but the point is – go crazy (or not) with decorating. It's up to you! 

I will continue to show the steps on my decorating journey, mostly for my own happiness. And a little bit for your benefit (but mostly for my happiness).

(ALSO - I feel like the word "optional" makes it sound like all the other steps are REQUIRED. Let's be real - we are making arts and crafts. None of this stuff is required. In life. In general. I wish I had useful skills.)

...back to the task at hand. 

Step 3: (optional) 
Paint the glitter/ModPodge mix onto the frame.


Don't forget the edges. DETAILS ARE IMPORTANT.

Step 4: (optional)
Let that dry for a little while.

Step 5: (optional)
Plot out the placement of anything you plan to glue onto the frame. Planning rules!

Step 6: (optional)
Get some of that glue onto your working surface and put some on your paint brush.

Step 7: (optional)
Glue the gems onto the frame. Let that dry for a little while. 

Step 8: 
Flip your frame over and cut the wire mesh to be about 1/2" larger than the space in the frame.

Step 9: 
Use your finger to fold the wire mesh into the edges of the frame. Make sure you really get it into the corners and that the wire is taut. This will be enough to keep the wire in place! So easy!

Step 10:
Staple the ribbon onto the back side of the two top corners of the frame.

And there you have it:
A gloriously glittery frame to house my gloriously glittery jewels! Now show me yours! Too lazy to make your own? I'll do it for you! Maybe you just want to chat. That's cool too.